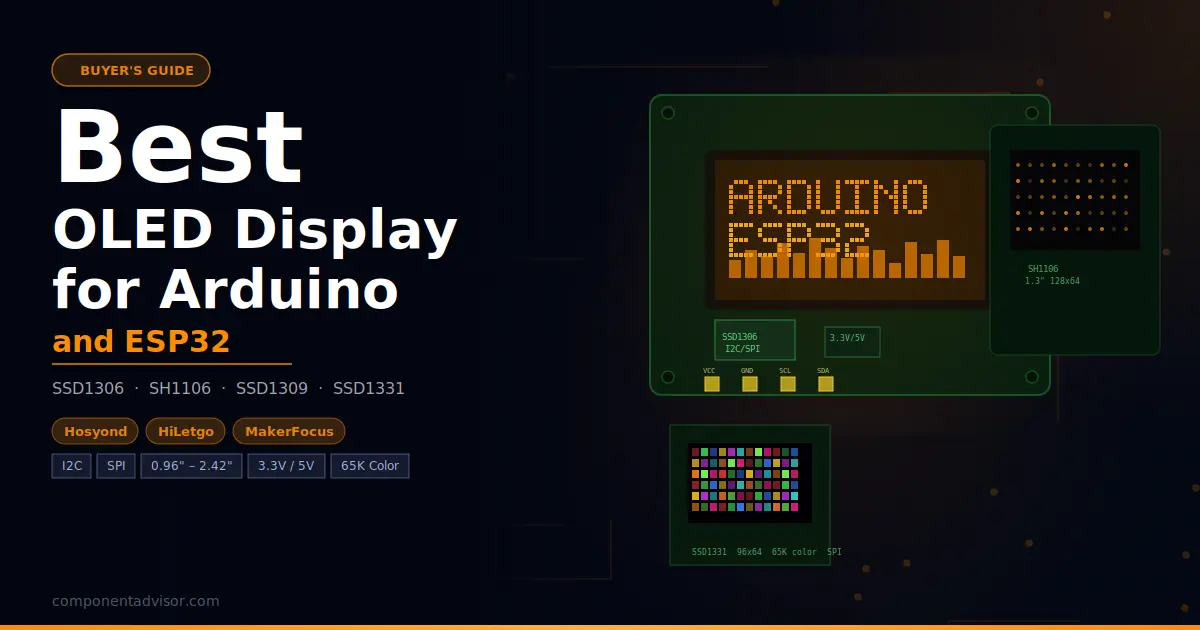
If you want to add a small screen to your project without dealing with a backlight, complex wiring, or a display that washes out in the dark, an OLED is the obvious choice. The best OLED display for Arduino and ESP32 builds depends less on brand and more on three things: screen size, driver chip, and whether you need I2C or SPI. Get those three right and you’ll have a working display in under fifteen minutes. Get them wrong and you’ll spend an evening wondering why your pixels are shifted two columns off-screen.
This guide covers six of the most useful OLED modules available on Amazon, from the ubiquitous 0.96-inch SSD1306 to a 65K-color SSD1331. Each section includes real specs, honest library guidance, and clear notes on what each display is actually suited for. There’s also an educational section on driver chip differences, a library comparison, and a burn-in explainer, because these are the questions that fill Arduino forums and rarely get a straight answer.
Building your first project? Check out our guides to the Best Arduino Starter Kits and Best Breadboard and Jumper Wire Kits on ComponentAdvisor.
Quick Comparison Table
| Display | Size | Driver | Resolution | Interface | Voltage | Best For |
|---|---|---|---|---|---|---|
| Hosyond 0.96″ SSD1306 | 0.96″ | SSD1306 | 128×64 | I2C | 3.3V/5V | First OLED, most tutorials |
| MakerFocus 0.91″ SSD1306 | 0.91″ | SSD1306 | 128×32 | I2C | 3.3V/5V | Compact, narrow status bars |
| Hosyond 1.3″ SH1106 | 1.3″ | SH1106 | 128×64 | I2C | 3.3V/5V | More readable text, bigger screen |
| HiLetgo 1.5″ SH1107 | 1.5″ | SH1107 | 128×128 | I2C/SPI | 3.3V/5V | Square format, most pixels |
| HiLetgo 2.42″ SSD1309 | 2.42″ | SSD1309 | 128×64 | I2C/SPI | 3.3V/5V | Largest display, panel projects |
| HiLetgo 0.95″ SSD1331 | 0.95″ | SSD1331 | 96×64 | SPI | 3.3V/5V | Full 65K color |
1. Best First OLED Display: Hosyond 0.96″ SSD1306
Hosyond 5-Pack 0.96 Inch SSD1306 OLED Display Module
Best for: Anyone adding an OLED to their first project. More tutorials exist for this exact module than any other display in hobby electronics.

The 0.96-inch SSD1306 is the display that shows up in almost every Arduino and ESP32 beginner tutorial, and with good reason. It’s cheap (especially in a 5-pack), it needs just four wires (VCC, GND, SDA, SCL), and the Adafruit SSD1306 library is one of the most polished and well-documented display libraries in the Arduino ecosystem. Open Arduino IDE, go to Library Manager, search “Adafruit SSD1306”, install it along with the Adafruit GFX dependency, and you’re reading and writing pixels within minutes.
At 128×64 pixels with white (or blue, or yellow/blue split) pixels on a black background, it’s not a high-resolution display. But it’s genuinely readable, has excellent contrast in any lighting, and draws very little power since pixels only consume energy when lit. The I2C interface means two wires shared with any other I2C devices on your bus, leaving your other GPIO pins free. Default I2C address is 0x3C, with some modules offering 0x3D via a solder jumper.
The Hosyond 5-pack is a good buy for two reasons. First, the per-unit price makes it worth having spares. Second, and more practically, OLED displays are susceptible to static damage and the occasional dead-on-arrival unit. Having backups on the bench removes that headache entirely.
One thing to know about the yellow/blue split variant: the top section (roughly 16 pixels) is yellow and the bottom section (48 pixels) is blue. This isn’t a switchable dual-color display where you can choose which pixels are which color. The color regions are fixed in hardware. Most libraries treat it as a standard 128×64 monochrome display and you work around the color regions in your layout.
Specifications:
- Screen size: 0.96 inch
- Driver: SSD1306
- Resolution: 128×64 pixels
- Interface: I2C (4-pin: VCC, GND, SCL, SDA)
- I2C address: 0x3C (0x3D via solder jumper on some units)
- Operating voltage: 3.3V or 5V
- Display color: White, Blue, or Yellow/Blue (variant dependent)
- Viewing angle: >160 degrees
- Power consumption: ~20mA active
Why it stands out:
- Most tutorials, examples, and community Q&As of any OLED module
- Adafruit SSD1306 + GFX library is clean, well documented, and actively maintained
- 5-pack pricing means spares on the bench at minimal cost
- 3.3V and 5V compatible, works directly with ESP32 and Arduino Uno/Nano
- I2C means only two wires, shares bus with other sensors easily
Things to keep in mind:
- Yellow/blue split color is fixed in hardware, not software controlled
- 128×64 resolution limits how much information fits on screen
- Two modules on the same I2C bus require different addresses (0x3C and 0x3D), so maximum two per bus without a multiplexer
- Some units arrive with pins at VCC-GND-SCL-SDA order, others at GND-VCC-SCL-SDA, check before wiring
👉 Buy Hosyond 0.96″ SSD1306 OLED 5-Pack on Amazon
Verdict: The 0.96-inch SSD1306 is the right first OLED. The Hosyond 5-pack is the most practical way to buy it. ArduinoYard has complete wiring and code walkthroughs for both OLED with Arduino and OLED with ESP32 if you want to hit the ground running.
2. Best Compact OLED for Status Displays: MakerFocus 0.91″ SSD1306
MakerFocus 2-Pack 0.91 Inch SSD1306 OLED Display Module
Best for: Projects where vertical space is limited: status bars, wearables, small enclosures, and anywhere a full 128×64 display is too tall.

The 0.91-inch SSD1306 uses the same driver chip and the same library as the 0.96-inch module, but the screen is 128×32 rather than 128×64. That means half the vertical resolution in a significantly narrower physical form factor. The module measures roughly 38mm x 12mm, which makes it a natural fit for tight enclosures, front panels, wearable builds, or anywhere you need a one-line status readout rather than a full display.
Because it’s the same SSD1306 driver, the library setup is identical. The only change in code is setting SCREEN_HEIGHT to 32 instead of 64 when initializing the display object. Everything else works the same way. The I2C address is 0x3C by default, same wiring, same four pins.
What you gain in compactness you give up in usable area. 128×32 fits about two lines of text at the default font size, or four lines at the smallest font. For a temperature reading, a sensor value, a Wi-Fi status indicator, or a progress bar, it’s perfectly adequate. For anything that needs a menu, multiple data fields, or graphics, the 0.96-inch 128×64 is the better choice.
The MakerFocus 2-pack is a reliable option with good reviews and consistent I2C addresses across units.
Specifications:
- Screen size: 0.91 inch
- Driver: SSD1306
- Resolution: 128×32 pixels
- Interface: I2C (4-pin)
- I2C address: 0x3C
- Operating voltage: 3.3V or 5V
- Display color: White
- Power consumption: ~10mA active
Why it stands out:
- Smallest I2C OLED in this lineup, fits extremely tight spaces
- Same SSD1306 driver and library as the 0.96-inch version, zero relearning
- Single-color white display, clean and readable for status text
- Very low power draw for battery-powered projects
Things to keep in mind:
- 128×32 limits display content to 2-4 lines of text
- Not suitable for graphics-heavy applications
- Same address constraint as the 0.96-inch (max two per I2C bus)
- Physically small pins, can be fiddly to solder headers onto
👉 Buy MakerFocus 0.91″ SSD1306 OLED on Amazon
Verdict: If your project needs a small indicator display rather than a full dashboard, the 0.91-inch is the right size. Two sensor readings, a status message, or a progress bar: it handles these well and takes up almost no space. For anything more complex, step up to the 0.96-inch 128×64.
3. Best Larger I2C Display: Hosyond 1.3″ SH1106
Hosyond 5-Pack 1.3 Inch SH1106 OLED Display Module
Best for: Projects where the 0.96-inch display is too small to read comfortably, or where you want more pixels for text and simple graphics at a similar price.

The 1.3-inch SH1106 is the most common upgrade from the 0.96-inch SSD1306. The screen is physically larger and the same 128×64 resolution now has bigger pixels, which makes text noticeably more readable at a distance. This matters more than it sounds when you’re displaying sensor readings across a room, or building something that will be wall-mounted.
The important thing to know upfront: the SH1106 uses a different driver chip than the SSD1306, and that difference matters for your library choice. The SSD1306 has 128 columns of display RAM. The SH1106 has 132 columns of RAM but only drives 128 visible columns. If you load SSD1306 library code on an SH1106 display, your graphics will appear shifted two pixels to the left or right, and some columns may show garbage pixels. It’s one of the most common OLED headaches beginners run into.
The fix is simple: use either the Adafruit SH110X library (Adafruit_SH1106G constructor) or the U8g2 library with U8G2_SH1106_128X64_NONAME_F_HW_I2C. Both work well. The API calls are nearly identical to the SSD1306 library so your existing code needs minimal changes.
The Hosyond 5-pack gives you the same per-unit value as their 0.96-inch offering and the quality is consistent. The I2C address is 0x3C by default.
Specifications:
- Screen size: 1.3 inch
- Driver: SH1106
- Resolution: 128×64 pixels
- Interface: I2C (4-pin: VCC, GND, SCL, SDA)
- I2C address: 0x3C
- Operating voltage: 3.3V or 5V
- Display color: White
- Viewing angle: >160 degrees
Why it stands out:
- Larger pixels make text more readable than the 0.96-inch at the same resolution
- Same 128×64 resolution so existing display layouts mostly work unchanged
- 5-pack pricing provides good per-unit value with spares
- Works with Adafruit SH110X and U8g2 libraries, both well maintained
Things to keep in mind:
- Requires SH1106-specific library, not the standard Adafruit SSD1306
- Loading SSD1306 code on this display will produce shifted or garbled pixels
- 0x3C I2C address is fixed on most units (some have a solder jumper for 0x3D)
- Slightly slower I2C refresh rate than SSD1306 due to page-mode-only architecture
👉 Buy Hosyond 1.3″ SH1106 OLED 5-Pack on Amazon
Verdict: The 1.3-inch SH1106 is the right display when the 0.96-inch is too small and you want to stay on I2C without jumping to a bigger module. Just use the correct library from the start and it works cleanly. For a weather station, clock, or sensor dashboard that people will actually read, the larger size makes a real difference.
4. Best for Maximum Pixels: HiLetgo 1.5″ SH1107 128×128
HiLetgo 1.5 Inch SH1107 128×128 OLED Display Module
Best for: Projects that need more vertical screen space, square aspect ratio content, or more room for text and graphics than 128×64 can provide.
The HiLetgo 1.5-inch SH1107 is the only square display in this lineup. At 128×128 pixels, it has four times the pixel count of the 0.91-inch module and twice the vertical resolution of the standard 128×64 displays. That extra vertical space makes a noticeable difference when you want to display multiple lines of data, a small menu structure, a bitmap image, or sensor readings with labels underneath the values rather than alongside them.
The SH1107 driver is handled by the Adafruit SH110X library, the same one that covers the SH1106. For a 128×128 display specifically, use the Adafruit_SH1107 constructor with width and height set to 128. The library is available directly through the Arduino Library Manager. U8g2 also supports the SH1107 with several constructor options depending on your communication mode. Both libraries work well in practice.
One important caveat: 128×128 pixels requires a 2KB frame buffer in SRAM. On an Arduino Uno (which has exactly 2KB of total SRAM), this consumes virtually all available memory, leaving almost nothing for your program variables and stack. This display works on an Uno but you need to be extremely careful with memory usage. On an Arduino Mega (8KB SRAM), ESP32 (512KB), or any 32-bit board, there’s no problem at all. If you’re running this on an Uno and experiencing crashes or strange behavior, memory is the first thing to investigate.
The module supports both I2C and SPI interfaces via solder jumpers on the back. I2C is the simpler wiring choice for most projects.
Specifications:
- Screen size: 1.5 inch
- Driver: SH1107
- Resolution: 128×128 pixels
- Interface: I2C or SPI (solder jumper selectable)
- Operating voltage: 3.3V or 5V
- Display color: White
- Grayscale: 16 levels
- Viewing angle: >160 degrees
Why it stands out:
- Highest pixel count of any mono display in this lineup
- Square aspect ratio suits different content layouts than 128×64
- 16-level grayscale gives more rendering options than pure mono
- Adafruit SH110X and U8g2 library support, both solid
- I2C or SPI selectable via solder jumpers
Things to keep in mind:
- 2KB SRAM frame buffer exhausts an Arduino Uno’s memory, use with Mega, ESP32, or similar
- Requires SH1107-specific library setup, slightly more involved than SSD1306
- U8g2 requires a 32-pixel horizontal offset compensation on some units
- Solder jumper interface selection requires careful handling to change
👉 Buy HiLetgo 1.5″ SH1107 128×128 OLED on Amazon
Verdict: For ESP32, Arduino Mega, or any memory-rich board, the 1.5-inch SH1107 is an excellent choice when you need more screen real estate than 128×64 provides. The square format is genuinely different from everything else in this list and opens up layout options that 128×64 can’t match. Avoid using it on an Arduino Uno unless you’re very confident in your memory management.
5. Best Large Display: HiLetgo 2.42″ SSD1309 128×64
HiLetgo 2.42 Inch SSD1309 128×64 OLED Display Module
Best for: Panel displays, instrument clusters, anything that needs to be readable from more than half a meter away, and projects where display size is the primary requirement.

At 2.42 inches, the SSD1309 is in a completely different visual weight class from the smaller modules in this lineup. The 128×64 resolution is the same as the 0.96-inch SSD1306, but spread across a display that’s nearly three times the diagonal size. Individual pixels are large, characters are easily readable from across a room, and the OLED contrast makes it pop even in bright ambient light. This is the display for a bench instrument, a wall-mounted monitor, a racing dashboard, or any project where someone needs to read the screen without leaning in.
The SSD1309 is compatible with the Adafruit SSD1306 library, which is a genuine convenience. In practice, you can load SSD1306 code, change nothing except possibly the I2C address, and it works. Some users use U8g2’s U8G2_SSD1309_128X64_NONAME0_F_HW_I2C constructor for more rendering options. The HiLetgo listing supports both I2C (4-pin) and SPI (7-pin) interfaces, with SPI being the faster option for animations or rapid display updates.
One honest note on the SPI default: many SSD1309 modules ship with SPI as the factory default interface. Switching to I2C requires moving two solder jumper resistors on the back of the board. It’s a simple operation but involves a soldering iron. If you’re not comfortable with that, verify you’re ordering the I2C-specific variant if one is available, or plan to work with SPI from the start.
Specifications:
- Screen size: 2.42 inch
- Driver: SSD1309
- Resolution: 128×64 pixels
- Interface: I2C (4-pin) or SPI (7-pin), selectable via solder jumper
- I2C address: 0x3C (Low) or 0x3D (High) via DC pin
- Operating voltage: 3.3V or 5V
- Display color: White
- Pixel size: 0.4 x 0.4mm
Why it stands out:
- Largest display in this lineup, readable from several meters
- SSD1309 is compatible with the Adafruit SSD1306 library, minimal code changes
- Supports both I2C and SPI, fast SPI mode for animation-heavy applications
- Two selectable I2C addresses allow two units on the same bus
- High contrast OLED panel, visible in bright ambient light
Things to keep in mind:
- Larger physical size means it dominates smaller enclosures
- Ships in SPI mode by default, switching to I2C requires moving solder jumpers
- 128×64 resolution means relatively large individual pixels at this screen size
- More expensive than smaller modules
👉 Buy HiLetgo 2.42″ SSD1309 OLED on Amazon
Verdict: If screen real estate is the priority, nothing else in this lineup comes close. The SSD1309’s SSD1306 library compatibility means there’s almost no extra setup work relative to the smaller modules. For any project where the display needs to be read at a distance, this is the right display to buy.
6. Best Color OLED: HiLetgo 0.95″ SSD1331 96×64
HiLetgo 0.95 Inch SSD1331 96×64 Color OLED Display
Best for: Projects that genuinely need color: data visualization with color-coded readings, graphical UI elements, retro-style graphics, or any display where monochrome isn’t enough.

Every other display in this lineup is monochrome. The SSD1331 is the exception: it supports 65K colors (16-bit RGB565) across a 96×64 pixel OLED panel. Individual pixels can be any color from the 65K palette, which opens up genuinely different project possibilities: color-coded sensor alerts (red for danger, green for normal), colored graph lines on a black background, sprite-based graphics, or simply a much more visually engaging display than white-on-black allows.
The tradeoff is interface complexity. The SSD1331 uses SPI only, there’s no I2C option. SPI requires more pins: SCK, MOSI, CS, DC, and RESET, so five GPIO pins instead of two. On a Uno this is manageable. On an ESP32 with plenty of GPIO it’s no problem. The Adafruit SSD1331 library handles everything cleanly and is available through the Arduino Library Manager. The Adafruit_SSD1331 constructor takes the pin numbers for CS, DC, MOSI, SCK, and RESET.
Worth being realistic about resolution: 96×64 is small. Color helps, but you still can’t fit a lot of information on screen. This display excels at graphical content rather than text-heavy dashboards. A color bar graph, an animated icon, a colorful readout with a large number in the center: these look genuinely good. Three lines of small text in multiple colors: less compelling.
Specifications:
- Screen size: 0.95 inch
- Driver: SSD1331
- Resolution: 96×64 pixels
- Color depth: 65K colors (16-bit RGB565)
- Interface: SPI only (SCK, MOSI, CS, DC, RESET)
- Operating voltage: 3.3V or 5V
- Display color: Full color
Why it stands out:
- Only full-color OLED in this lineup
- 65K color palette (16-bit RGB565) enables genuine color-coded displays
- Adafruit SSD1331 library is well maintained and easy to use
- OLED contrast makes colors vivid, especially on dark backgrounds
- Compact form factor with the visual impact of color
Things to keep in mind:
- SPI only, requires 5 GPIO pins vs 2 for I2C
- 96×64 resolution is smaller than the other displays here
- More expensive per unit than monochrome modules
- Color OLED panels are more susceptible to burn-in with static images over long periods
👉 Buy HiLetgo 0.95″ SSD1331 Color OLED on Amazon
Verdict: If your project calls for color, the SSD1331 is a capable and well-supported choice. Go in knowing that SPI-only means more wiring, and that 96×64 limits how much you can fit on screen. For colorful graphics and data visualization, it earns its place. For text-heavy status displays, a monochrome display is easier to work with.
Which OLED Display Should You Buy?
For a first OLED project with no other constraints, buy the Hosyond 0.96-inch SSD1306 5-pack. The library is excellent, the tutorials are everywhere, and having five units means you’re never stopped by a dead module or an accident on the breadboard.
If the 0.96-inch is too small for the text you want to display, the Hosyond 1.3-inch SH1106 is the most natural upgrade. The physical size difference is immediately noticeable, the library switch is a five-minute job, and the 5-pack pricing keeps it affordable. Just use the SH1106-specific library from the start and you’ll have no issues.
For projects where everything needs to fit in a very small enclosure, or where the display is just showing a status value or two, the MakerFocus 0.91-inch SSD1306 is the cleanest solution. Same library as the 0.96-inch, half the height, minimal wiring.
When you need the most pixels in a mono display, the HiLetgo 1.5-inch SH1107 at 128×128 gives you a square format with double the vertical resolution of the standard 128×64 modules. Pair it with an ESP32 or Arduino Mega and the memory requirements are trivial.
For large, room-readable displays, the HiLetgo 2.42-inch SSD1309 is in its own category. Nothing else here is as visible from a distance, and the SSD1306 library compatibility keeps setup simple.
If color is genuinely part of the project, the HiLetgo 0.95-inch SSD1331 is the only option in this lineup. Budget for the extra GPIO pins and be thoughtful about what you’re displaying.
Driver Chip Explained: SSD1306 vs SH1106 vs SSD1309 vs SH1107
This is the section that saves you an afternoon of confused debugging.
SSD1306 is the most common OLED driver chip in hobby electronics. It has 128 columns of display RAM matching the 128-pixel display width, supports horizontal, vertical, and page addressing modes, and is supported by the Adafruit SSD1306 library. The horizontal addressing mode lets you stream an entire 1024-byte frame buffer in one continuous I2C transaction, which is why the SSD1306 is slightly faster to update than the SH1106. If a display listing doesn’t specify the driver chip, and it’s a 0.96-inch 128×64, it’s almost certainly an SSD1306.
SH1106 is architecturally similar to the SSD1306 but with one meaningful difference: it has 132 columns of internal RAM driving 128 visible columns. This creates a 2-pixel offset on each side of the visible area. The SH1106 also only supports page addressing mode, not horizontal or vertical. If you try to drive an SH1106 with SSD1306 library code, your display will show content shifted a couple of pixels off-center, and the leftmost or rightmost columns may contain garbage pixels. The fix is switching to the Adafruit SH110X library or U8g2. The 1.3-inch size is most commonly an SH1106, not an SSD1306, though exceptions exist.
SSD1309 is essentially an upgraded SSD1306. It’s compatible with the same library, supports both I2C and SPI, and is typically used in larger OLED panels like the 2.42-inch. The interface defaults to SPI on most modules, switchable to I2C via solder jumpers. For coding purposes, treat it exactly like an SSD1306.
SH1107 is a different driver designed for displays up to 128×128 pixels. It’s handled by the Adafruit SH110X library using the Adafruit_SH1107 constructor. The 128×128 frame buffer requires 2KB of SRAM, which is significant on memory-constrained boards.
The practical rule: check the driver chip before you start coding. If a listing says “1.3-inch 128×64 I2C OLED”, assume SH1106 unless explicitly stated otherwise, and use the SH110X library. If it says “0.96-inch 128×64 I2C OLED”, it’s almost certainly SSD1306. When in doubt, check for a chip marking on the back of the board.
I2C vs SPI: Which Interface for OLED Displays?
Most small OLEDs support I2C, and for most projects that’s the right choice. I2C uses two wires (SDA and SCL) that are shared across every I2C device on your board. One OLED, a BME280 sensor, and an RTC module can all share the same two wires. Wiring is simple, pin usage is minimal, and the Adafruit libraries handle everything.
The tradeoff is speed. I2C maxes out at 400kHz in fast mode (some devices can push higher), which limits how fast you can refresh the display. For a temperature reading that updates every few seconds, this is completely irrelevant. For smooth animations or frequent display updates, SPI is noticeably faster.
SPI requires more pins: typically SCK, MOSI, CS, DC, and RESET, so five GPIO pins instead of two. But the data rate is much higher (up to 8MHz or more on many modules), which means full-screen refresh is significantly faster. For the SSD1309 and SSD1331 specifically, SPI is the better interface if you’re pushing display updates frequently.
A practical guide: use I2C if you’re displaying sensor readings, status text, or anything that updates at human-readable speeds. Use SPI if you’re drawing animations, games, or graphical content that needs fast refresh.
OLED Libraries: Adafruit SSD1306, SH110X, and U8g2
Three libraries cover the displays in this article. Here’s which to use for each.
Adafruit SSD1306 handles any SSD1306 or SSD1309-based display. Install via Library Manager (“Adafruit SSD1306”), install the Adafruit GFX dependency when prompted. Gives you text rendering, basic shapes, and bitmap drawing. Simple API, great documentation, actively maintained.
Adafruit SH110X handles SH1106, SH1106G, and SH1107 displays. Install via Library Manager (“Adafruit SH110X”). Uses Adafruit_SH1106G for 128×64 SH1106 displays, Adafruit_SH1107 for 128×128 SH1107 displays. Same GFX-based drawing API as the SSD1306 library, so code is mostly transferable.
U8g2 is a universal display library that handles dozens of OLED and LCD drivers including all of the ones in this article. It’s more complex to set up (you need to pick the right constructor from a long list), but it offers more rendering options, lower memory modes (tile buffer mode avoids the full frame buffer), and supports more display types. If you’re working on a memory-constrained board or want more control over the rendering pipeline, U8g2 is worth the extra setup time.
For most projects, stick with the Adafruit libraries. They’re simpler, the examples in the library are good starting points, and the GFX drawing API is consistent across all Adafruit display products.
OLED Burn-In: Is It a Real Concern?
Yes, but less so than most people assume for typical hobby use.
OLED displays can develop permanent image retention when the same pixels are lit at full brightness for extended periods, typically months of continuous operation with a static image. For a project that displays a clock or sensor reading with fixed labels for 24 hours a day, over months or years, burn-in is a real risk.
For most hobby projects, it isn’t. If your display is on for a few hours during development, updates its content regularly, or is only active when the device is in use, burn-in won’t be an issue within any reasonable project lifespan.
If you’re building something that will display a static image continuously, simple mitigations help: dim the display when not actively being read, rotate or shift the displayed content slightly over time, or turn the display off when idle using the display.ssd1306_command(SSD1306_DISPLAYOFF) call. The SSD1309, SH1106, and SH1107 have similar sleep commands via their respective libraries.
Final Recommendation
For the vast majority of Arduino and ESP32 projects, the Hosyond 0.96-inch SSD1306 5-pack is the best OLED display to start with. The library is excellent, tutorials are everywhere, and buying five at once is practical and economical. When you outgrow the size, the Hosyond 1.3-inch SH1106 is the most natural next step: bigger pixels, same resolution, minimal library change.
For complete wiring diagrams and working code, ArduinoYard has step-by-step guides for connecting an OLED to an Arduino and connecting an OLED to an ESP32, plus a project tutorial for building a digital clock with an ESP32 and OLED over NTP.
Explore more component guides on ComponentAdvisor: Best Arduino Sensor Kits, Best Resistor and Capacitor Kits, Best Multimeters for Electronics Beginners, and Best Breadboard and Jumper Wire Kits.